Phenotypic Data
The phenotypic module provides a user-friendly interface for collecting structured clinical data using standard ontologies such as the Human Phenotype Ontology (HPO), the Orphanet Rare Disease Ontology (ORDO), and Online Mendelian Inheritance in Man (OMIM). The image below displays the Phenotypic module dashboard, highlighting its key functionalities.
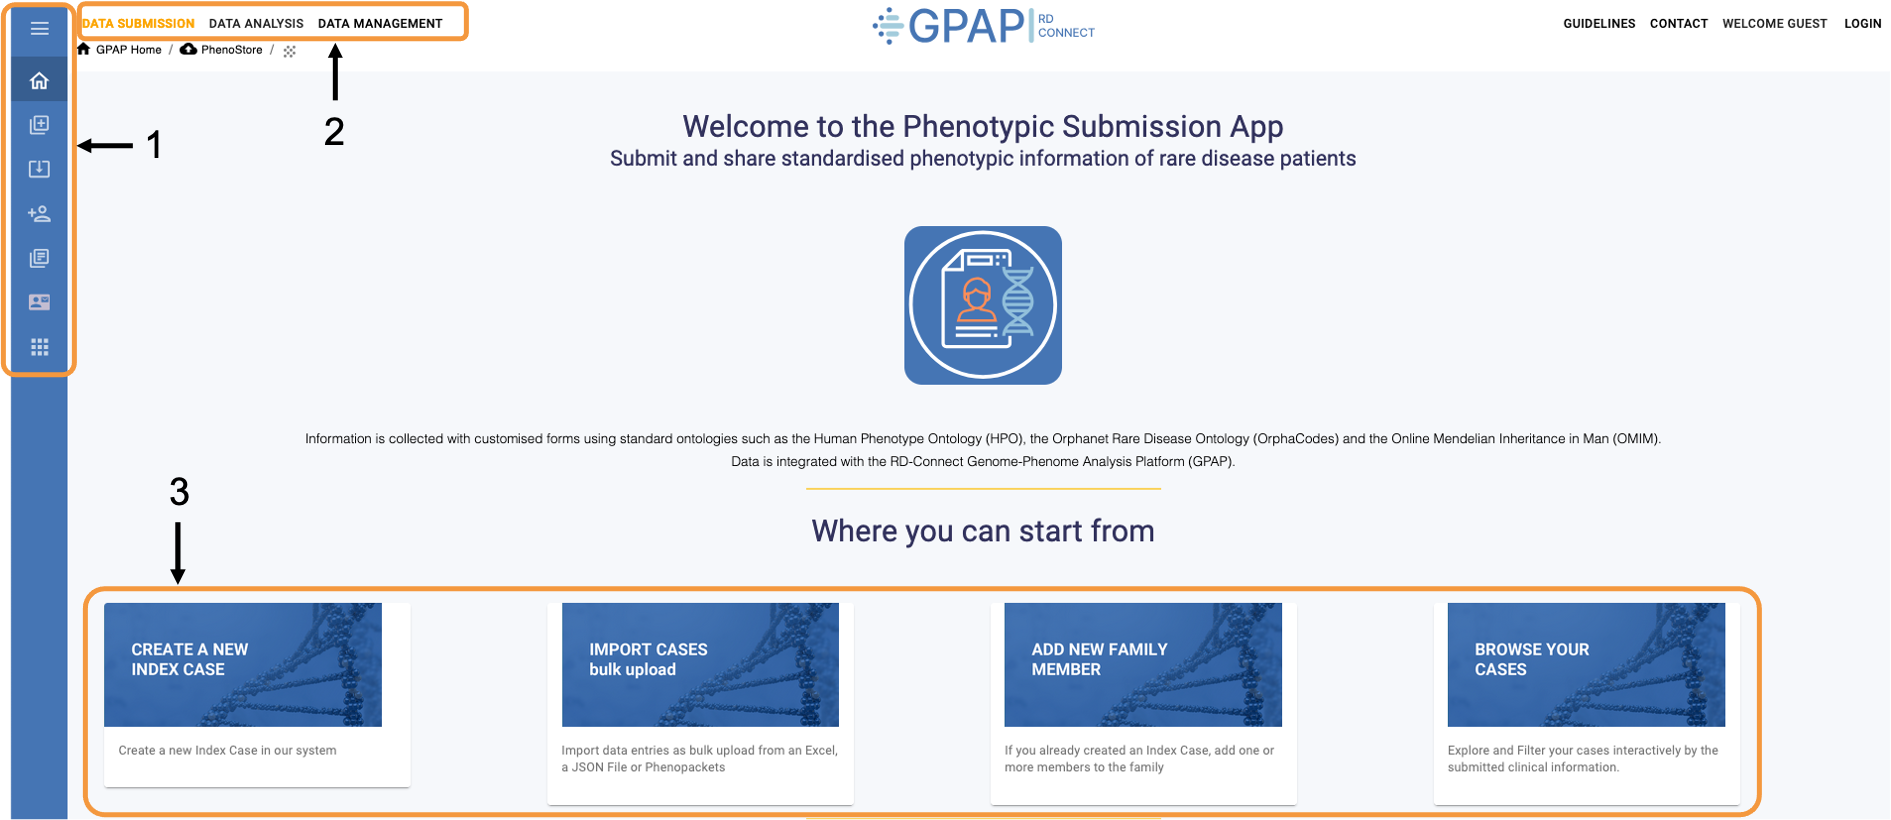
1 - Fixed sidebar across the Phenotypic module, providing quick access to various functionalities. Hover over the sidebar to expand and view descriptions of each icon.
2 - Toolbar for accessing other GPAP modules, including: Data Submission and Management (Experiment & Files, and Phenotypic Data) and Data Analysis (Genomic Analysis and Cohort Creation).
3 - Menu for entering participants through different options and browsing all participants related to your group(s).
Submission of phenotypic data
There are several ways to enter phenotypic information into the system:
Create a New Index Case: Case-by-case approach, recommended when phenotypic data is not structured using HPO/OMIM/ORDO
Import Cases: Bulk import via an Excel template or PhenoPackets, recommended when the data is already HPO/OMIM/ORDO encoded
Add New Family Member: Add additional family members to an existing index case
New Index Case
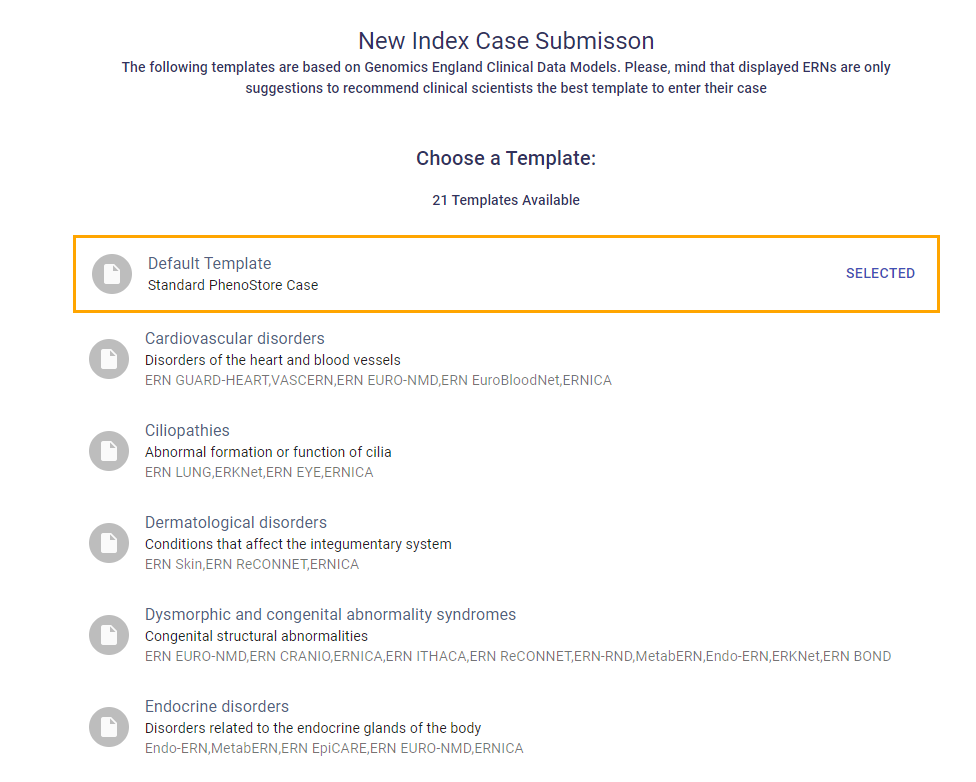
To manually enter new cases or families you must start with the index case. Click the Create a New Index Case button in the dashboard menu or navigation sidebar, and a pop-up will display the required steps. Press Create a New Case to proceed.
Several disease-specific templates, based on Genomics England Clinical Data Models, are available to streamline structured phenotypic data entry using HPO, ORDO and OMIM. Select a disease template relevant for your index case disease, or choose the Default template for a general form.
Follow the different steps to enter the patient’s phenotypic information. Note that structured vocabulary is used to capture the data and that several fields in the Individual Information section are mandatory. Once finalised press the Submit button to create the index case entry

Important
To create an index case, the following fields are required:
Local ID: code for this individual at your centre. Do not use personally identifying information.
Year of birth
Sex (Male/Female/Unknown)
Disease Status (Affected/Unaffected/Unknown)
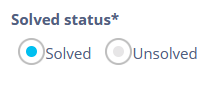
Solved status (Solved/Unsolved): only for affected individuals
In the case of a solved status, we ask that the final diagnosis is provided
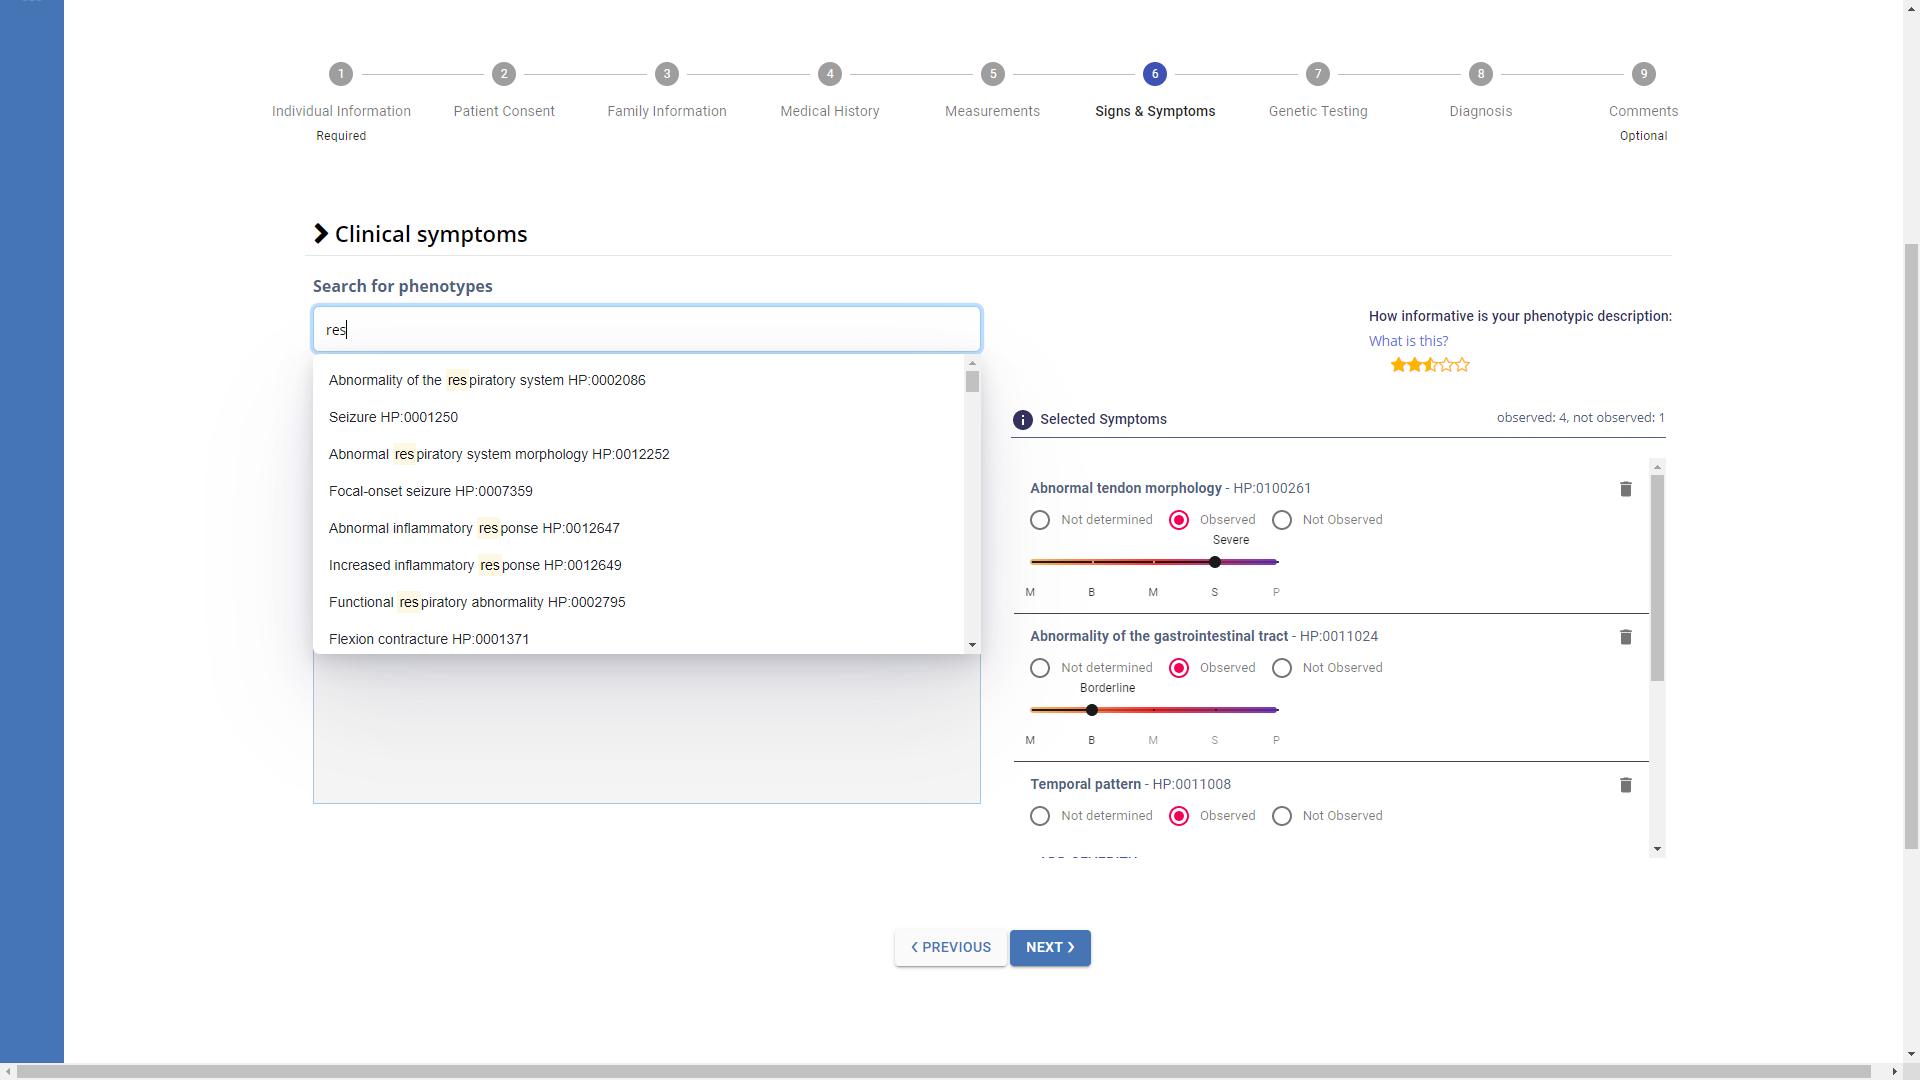
HPO terms can be entered through the Search for phenotypes bar, which browses the Human Phenotype Ontology, or by navigating the HPO tree.
When a disease template is selected, the HPO terms associated with that template are automatically loaded in the tree.
For each HPO term, you can indicate whether it is Observed or Not Observed. If it is observed, you can specify the level of severity with a slider that ranges from MILD to PROFOUND (HPO term for severity HP:0012824).
- Note
We strongly encourage selecting 5 or more HPO terms to describe a case’s symptoms (in section 6-Signs & Symptoms) and entering the suspected or confirmed clinical diagnosis (in section 8-Diagnosis) to facilitate downstream phenotypic and genomic analysis. This information is fully integrated in the GPAP (cohort creation, gene filtering, variant prioritisation, patient matchmaking, etc.).
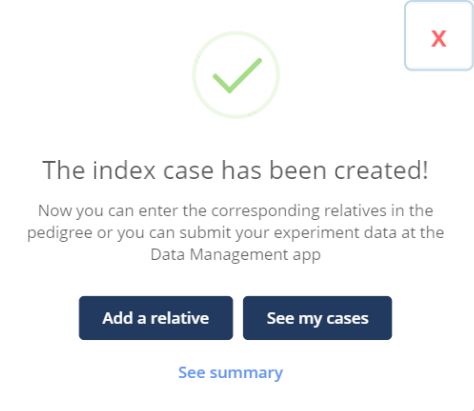
Once all phenotypic information has been entered in the various sections, click Submit. A confirmation message will appear, indicating that the index case has been created. From there, you can choose one of the following options to proceed:
Add a relative: to add additional members to the family (see New Family Member section)
See my cases: to browse all your data (see Browse GPAP PhenoStore Cases section)
See summary: to access a downloadable summary of the submitted participant
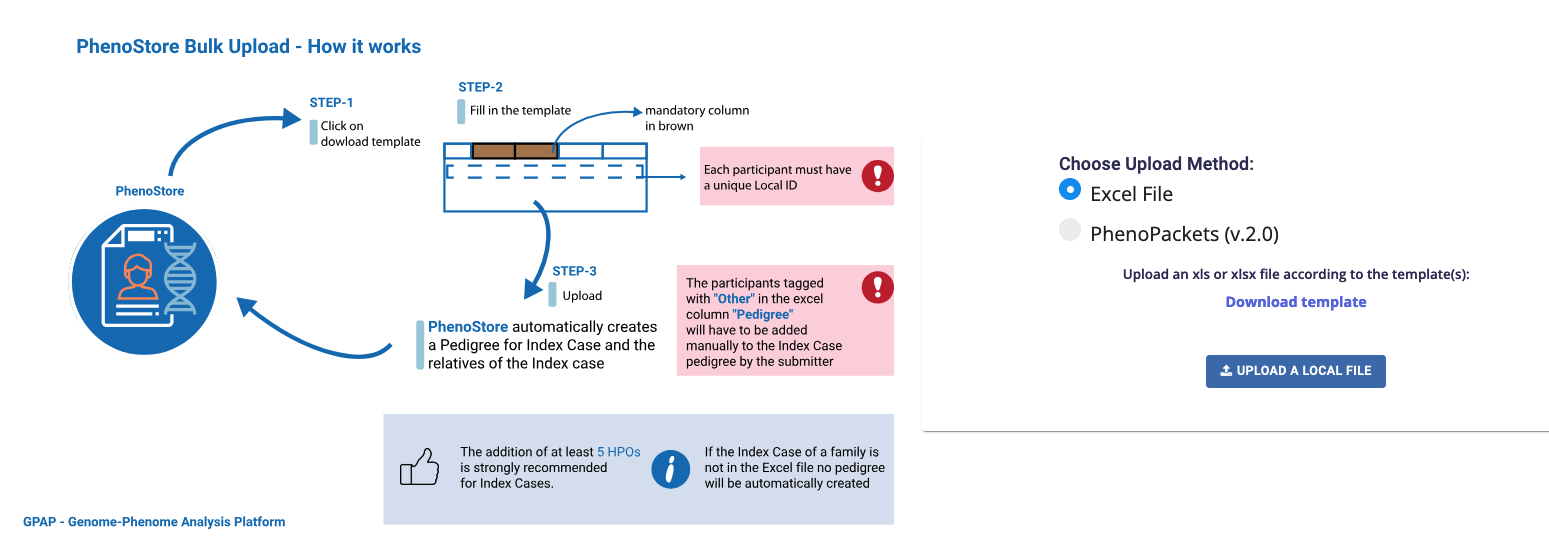
Import Cases
To perform a bulk import of phenotypic data, go to Import Cases in the dashboard menu or navigation sidebar of the Phenotypic module dashboard.
You can upload your phenotypic data using either an Excel template or PhenoPackets:
Excel file: Select Excel File, download the provided template, complete all the required fields, and use the Upload a Local File option to upload it. Note that several fields are mandatory. Finally, press Import to complete the submission.
PhenoPackets Select PhenoPackets and ensure they comply with the required format by reviewing the PhenoPackets schema. The Phenopackets must be uploaded unzipped using the Upload a Local File option.
New Family Member
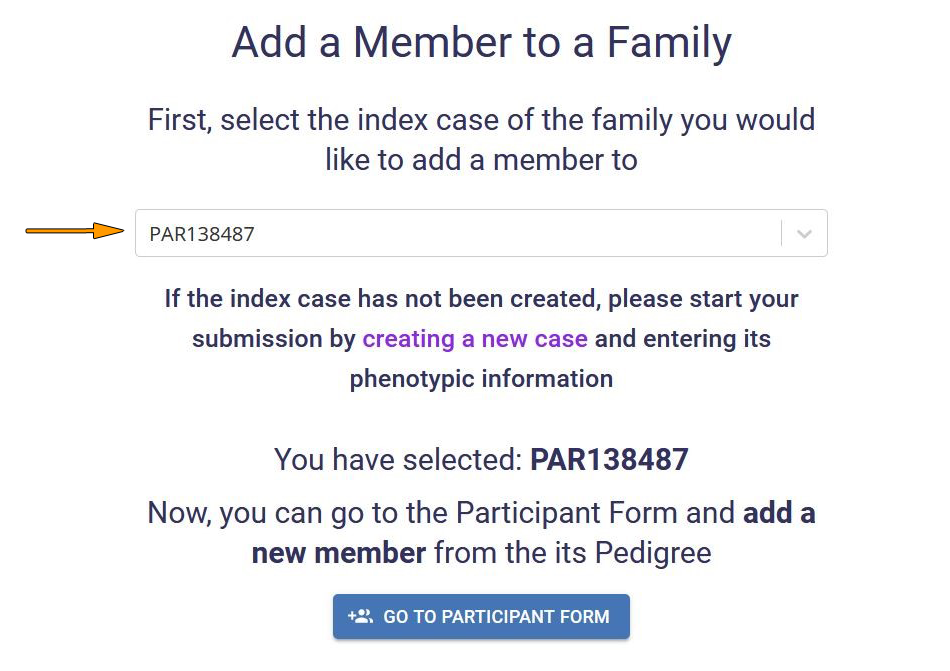
To add a member to an existing family, click Add New Family Member in the dashboard menu or navigation sidebar of the Phenotypic module dashboard.
Select the PhenoStore ID or Local ID of the index case for which you want to create a new member, and click on Go to participant form.
You will be redirected to the Index Case form. From here, click on the Pedigree tab to edit the family.
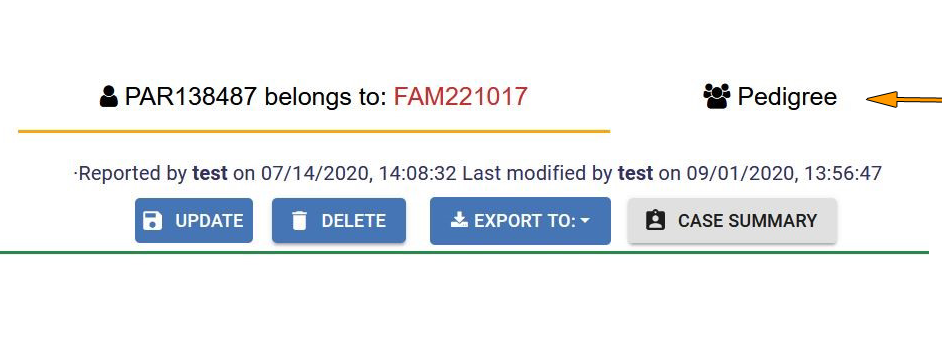
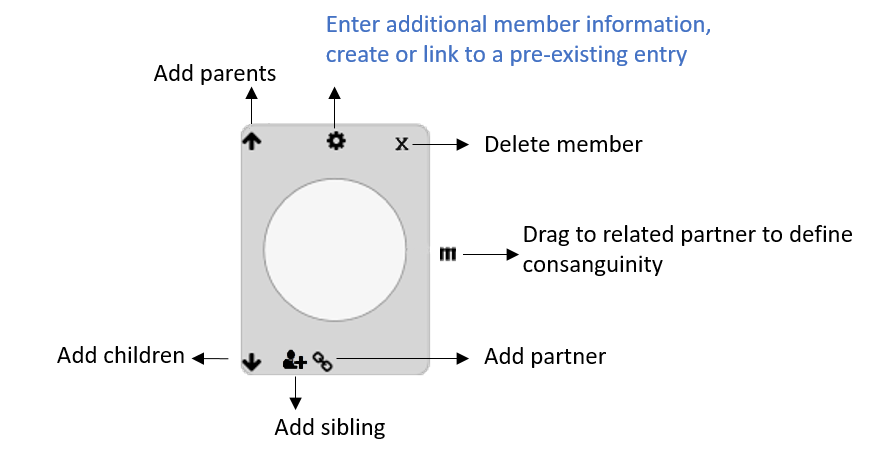
Use the Pedigree tools to add the new family member to the pedigree. Specific instructions on how to add individuals, and further information in the pedigree can be accessed by clicking on Read Instructions at the top right of the page. For more information, see Edit Pedigree section.
Edit Pedigree
A pedigree is editable only after the creation of an index case with the mandatory information.
You can enter a Pedigree (and export an image of it) by accessing a participant Case Summary (see Browse PhenoStore cases section for further details) and clicking on the Pedigree button.

- The pedigree editor will enable you to:
Export the pedigree in JSON or PED format
Import a new pedigree from a PED file
Access detailed instructions to modify a pedigree
Manually modify the current pedigree
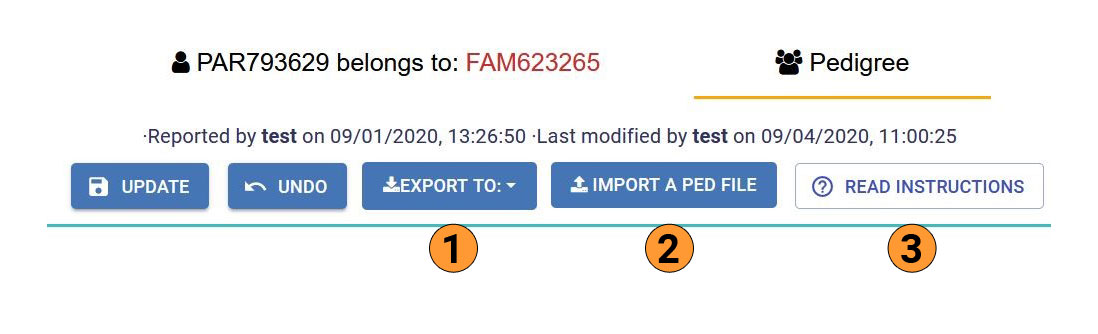
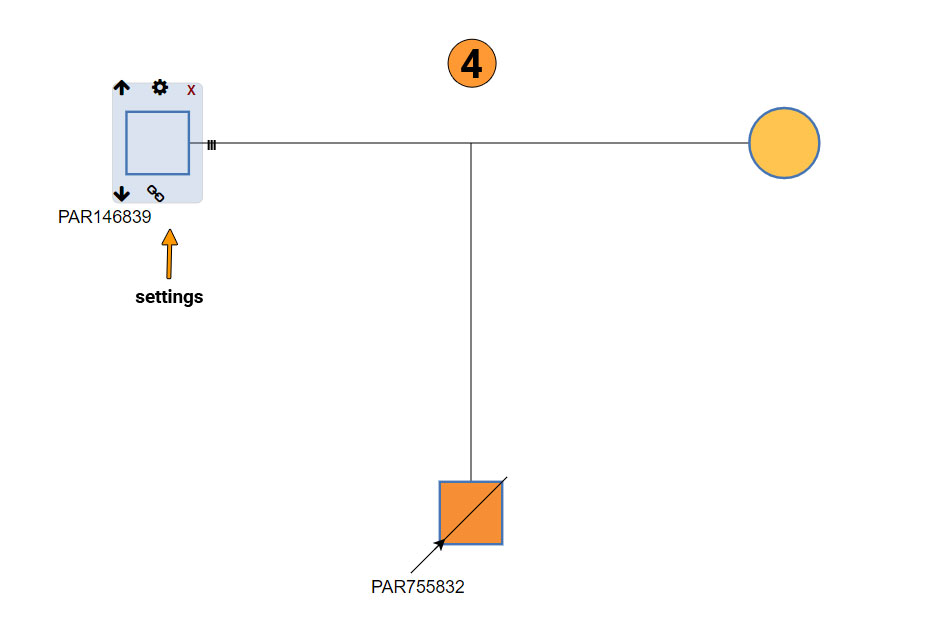
For detailed instructions, please refer to the image below. This can be also found by clicking on the detailed instructions (3).
Assign Participant Permissions
The group that created the record is the designated owner by default. You can change the ownership and share/unshare the record with other GPAP groups by following these steps:
Access the participant Case Summary (see Browse PhenoStore cases section) and click the Edit button

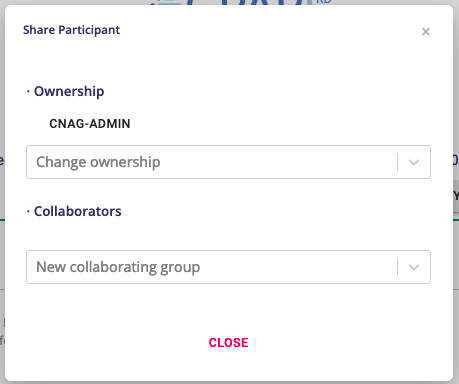
Click the Permissions button located at the top-right of the page.

A new menu will appear showing the current owner. To change the ownership or add a new collaborating group, select the appropriate group from the respective dropdowns. Once a collaborating group has been added, an Unlink button will appear, allowing the owner to unshare the participant’s record at any time.
Update newly solved cases
Updating your solved cases in the GPAP requires 2 steps:
Tag the causative variant in the Genomic module (see Label and Tag a Variant in Genomics Analysis section of this guide). If the causative variant(s) were not detected through GPAP, you can skip this step.
Update the Phenotipic record in the Phenotipic module.
2.1. Click Browse Cases in the bottom menu or the left sidebar of the Phenotypic module dashboard.
2.2. Select the case of interest by searching in the table using the search bars located below the header to access the participant’s summary
2.3. Click the Edit button to access the participant’s phenotipic record.
2.4. In section 1- Individual Information, change the Solved status field to Solved.
2.5. In section 7- Genetic Testing, ensure the causative variant(s) are listed. All tagged variants in the Genomics Analysis will be displayed. You can add further variants of interest by pushing the Add Gene, Add variant, or Add region buttons.

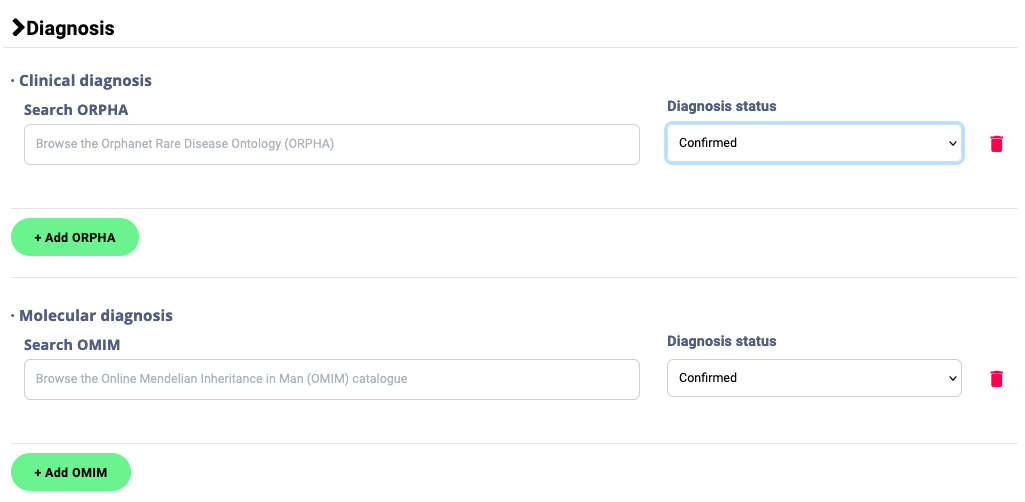
2.6. In section 8- Diagnosis, enter the corresponding Orpha and OMIM codes and the diagnosis status (confirmed/suspected)
External Resources
We rely on a set of external resources to facilitate participant data submission in a standard format.
The Orphanet Rare Disease ontology (ORDO): https://www.orpha.net/
Online Mendelian Inheritance in Man (OMIM) : https://www.omim.org/
The Human Phenotype Ontology (HPO) : https://hpo.jax.org/
Gene Search (HUGO Gene Nomenclature Committee): https://www.genenames.org
Management of phenotypic data
Browse GPAP PhenoStore Cases
Click Browse Cases in the dashboard menu or navigation sidebar of the Phenotypic module dashboard. This section provides a table summarising all your submitted data and the data shared with you, along with graphs displaying relevant statistics.
You can filter entries by selecting a specific time range, and the graphs and the table will be automatically updated.
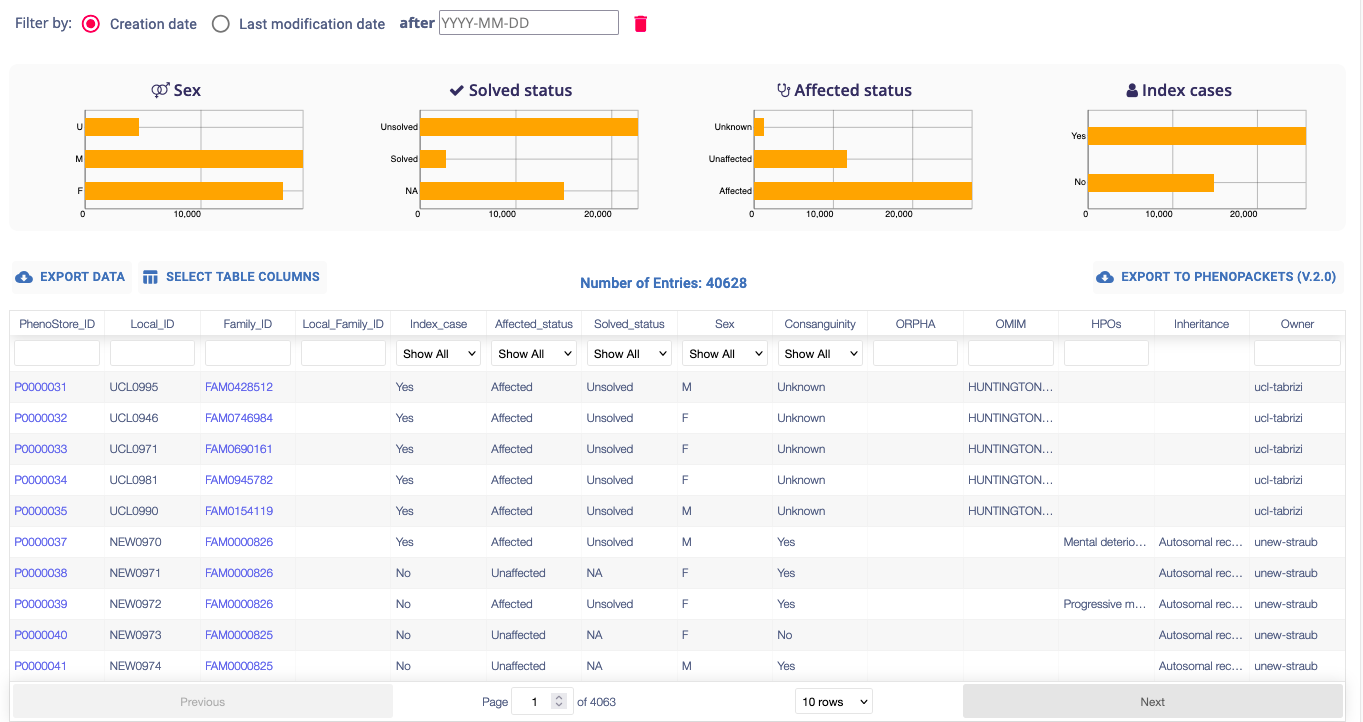
The participants table is interactive, each column is filterable and sortable via its header. The search bars located below the header allow you to search for a specific participant. The Select Table Columns button allows you to customize the displayed columns.
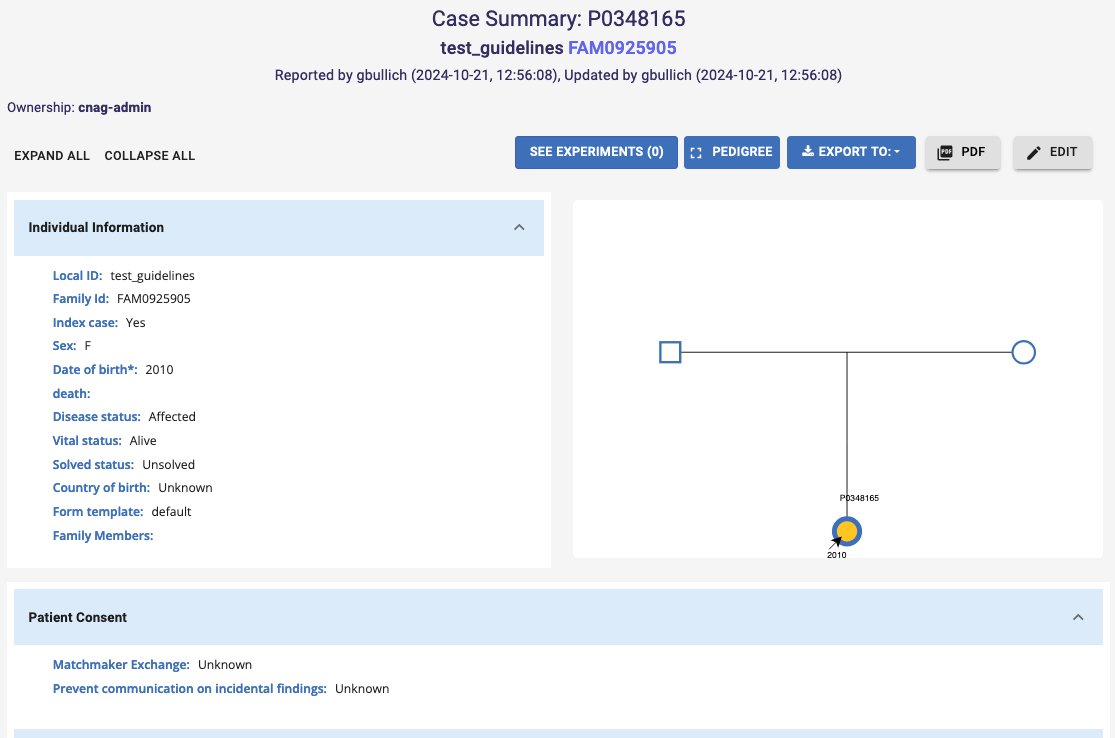
Click the ID of a particular participant in the table to access its Case Summary, which displays patient’s phenotypic information, pedigree and related experiments. You can click the Edit button to access the participant’s phenotypic record and pedigree, allowing you to edit the existing information.
Export GPAP Phenostore Cases
From the Browse Cases section, you can export the list of participants currently displayed in the table using several options:
Export Data: data can be exported in CSV or TSV format, with the option to select specific fields for export.
Export to PhenoPackets: limited to 500 participants for performance reasons

At individual level, from Case Summary phenotypic information can be exported in PhenoStore JSON, PhenoPacket and PDF formats
